The DataEase OLE DB Consumer is part of the DataEase system designed to access data from any OLE DB-enabled application via an OLE DB Provider.
To enable your application to connect to an external data source, you must customize the Consumer for each application. The Consumer customization includes providing all the necessary information about the data source you want to access, specifying an OLE DB Provider to the data, Providers parameters, etc. This connection-specific information is stored in a standard Universal Data Link (.udl) file and can be entered into your system via a special dialog window.
So, to configure your DataEase OLE DB Consumer, you must perform the following three actions:
Create a new Universal Data Link (.udl) file. Used to store connection information
Configure the UDL file. This is where you customize the Consumer for use with a particular data source by specifying the connection details such as data source, data source location, the Provider type, etc.
Create an OLE DB Database link. This is done from within the DataEase application, and allows the Consumer to transfer the data from the Provider into your application.
Note: Each OLE DB Database Link requires a different copy of a UDL file.
Step 1: Create a Universal Data Link (.udl) file
All connection information your DE application will use to link to an external relational or non-relational data source is stored in a Universal Data Link file that has a .udl extension.
To create a .udl file, please follow the instructions:
Open Windows Explorer.
Select the folder in which you want to store your .udl file, e.g. C:\OLEDB\.
If you are running Windows 2000 or later, select File>>New >>Text Document. A new file named New Text Document.txt appears in the directory. Rename this file, changing the file extension to .udl, e.g. OLEDB.udl
Note: A warning that changing file extensions can cause files to become unusable might appear. Disregard it.
If you are running with Windows NT systems with Microsoft Data Access Components (MDAC) installed, right-click the right pane, or results pane, select New >>Microsoft Data Link. A new file named New Microsoft Data Link.udl appears in the directory. You should rename this file to something more meaningful but its best to keep the name fairly short, since some products may have string length limitations. For example, when you define a DataEase Datalink you are allowed a maximum of 29 characters for the combined path and source name.
You now have a new empty .udl file with no information specified. The next task is to fill this file with actual data, by configuring the udl, as described below.
Step 2: Configure the universal data link (.udl) file
It is not enough to simply create a .udl file. Each .udl file must contain the actual connection parameters and data sources details.
To customize your .udl file, follow these steps:
Double-click your universal data link file (.udl) to load it.
The Data Link Properties dialog box opens, displaying the following tabs: Provider, Connection, Advanced, and All.
On the Provider tab, select a provider most suitable for your application needs from the list of available OLE DB Providers.
For example;
MS Access databases can be accessed via Microsoft OLE DB Provider for Jet 4.0 and Microsoft OLE DB Provider for ODBC.
To access MS SQL databases you should use Microsoft SQL Server OLE DB provider.
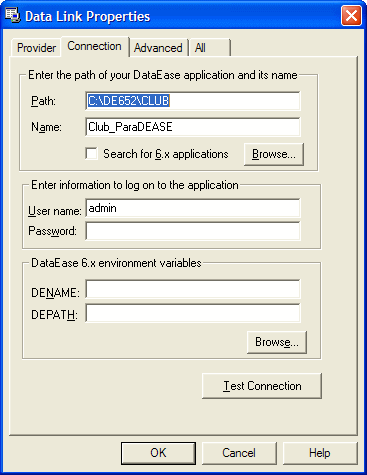
The data in another DataEase application can be accessed via Sapphire DataEase OLE DB Provider.
Your software will advise you as to which OLE DB Provider you should select.
After you have chosen a Provider, proceed to the Connection tab and specify the connection details.
Note: the number and type of connection details vary with each Provider.
For example, if you choose the Microsoft OLE DB Provider for SQL server, you will be presented with the following screen:
On the Connection tab, specify the connection properties specific for each Provider. Click Test Connection to test your connection to the data source specified. If the test connection fails, check the connections parameters and do another test.
Note: For more information about connection properties, refer to the documentation provided by each specific OLE DB Provider.
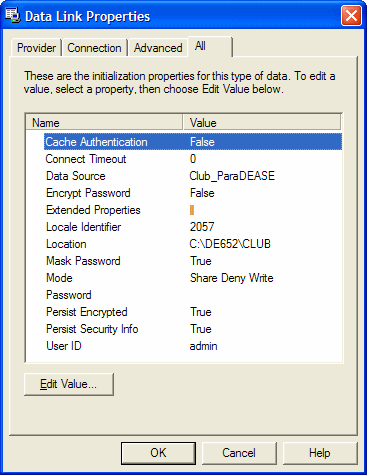
Use the Advanced tab to view and set other initialization properties for your data.
Note: For the Sapphire DataEase OLE DB Provider the Advanced tab is inaccessible. You will be unable to get into this tab, and instead you will be taken to the All tab.
Use the All tab to review and edit all OLE DB initialization properties available for your OLE DB provider. For example, the Microsoft OLE DB Provider for SQL server this tab will be similar to the one shown below:
Choose OK to save the connection information in the Universal Data Link (.udl) file.
Once you have configured your .udl file and tested the connection, you must create a new OLE DB Database link within your application.
Step 3: Create an OLE DB Database Link
To enable the DataEase OLE DB Consumer to use the data exposed by the Provider, you must create a new database link inside your DataEase application, via the Application>>Database Links dialog window.
Note: You must have a different copy of the .udl for each OLE DB Database Link.
Choose Application>>Database Links to display the Database links dialog.
Specify the following options:
Link Name is the name of a link you want to create. Enter any descriptive and meaningful name into this field. The Link Name is used to refer to this link from within your application.
Select OLEDB Provider from the drop-down Engine Type box. DataEase will use this engine for data retrieval.
Server Name. Use this field to enter the full path to the .udl file.This string can be no longer than 29 characters. If your path/udl name are longer than this, please shorten one or both of them.
Database Name. Enter any name into this field. Do not leave this field empty.
Tables Available. This field displays nothing until you add this link into your database by clicking the Add button.
Default Link. Leave the default value (NATIVE).
Add. When you click the Add button:
DataEase saves this link into your application and adds its name into the Catalogue>>DB Links.
DataEase automatically lists the tables available from the data source you have specified in the .udl file.
Note: In the Tables Available list the name of each table is followed by the Username value you have specified in the .udl file.
If you click Build Forms, DataEase will build a form based upon the table you choose.
Click Done to close the window.
As a result, the Application Catalogue lists:
All the Database Links existing within your application;
Properties for each Database Link;
The tables contained within each data source that can be seen if you click a particular Database Link: The graphic below illustrates a database which has multiple links via OLE DB.
