 Register
 Sign In

Workaround! DataEase.exe - Entry Point Not Found - DEVOBJ.DLL (Ver. 6.2.3.3158)
Over the last couple of weeks we have got some reports with this error message from LegEasy 6 Windows (6.53). The communality between the instances is that it was all on freshly installed Windows computers, but the windows versions ranges from Windows 7 Professional to Windows Server 2012 with Windows 8, 8.1 etc. in between.
As none of our computers, partners computers or even friends computers have this problem it hasn't been easy to pin down.
But this is what we know so far: It is has to do with a security update Microsoft has been distributing over the last couple of weeks and the problem is related to Domain/Active Directory.
LegEasy 6 is basically a recompilation of DataEase 6.52 with a lot of adpations and fixes. However, it is till built in Borland Turbo C++ and that is where the problem starts.
Borland Turbo C++ was discontinued more than a decade ago, and since then there has only been one community driven update do allow software built in to be updated. Because of the lack of support for "modern windows" it need to be installed on the ROOT drive of your computer as it can't handle long and complex Paths.
Windows is very unhappy with this procedure but it has accepted it reluctantly as long as the software is installed the correct way and with the correct rights.
However, Windows have felt entitled to move files around to Appdata/Virtualstore and to SysWOW64 etc, to make your installation more "secure", and this is where our problems stem from.
LegEasy 6.53 installed on computers with Domain control and acitve diretory (i.e. strict security) have gotten an override on DLLs that make DataEase.exe look for them in the SysWOW64 catalogue. Only problem is that the DEVOBJ.DLL LegEasy 6 need is from 2004 and the one that comes with this update is 10 years newer and with completely different functions and entry points. Because there already is a protected DLL that is newer, Windows assume everything is A OK and let DataEase.exe use the Microsoft version of this file when it need the Borland version that is installed in the Program Catalogue.
Luckily since this is a security override, the solution is to override the security...
1. Locate you DataEase program catalogue in Explorer (C:\DataEase65.local) and the file DataEase.exe.
2. Right-CLick on the file and choose Properties.
3. Select the Compatibility Tab.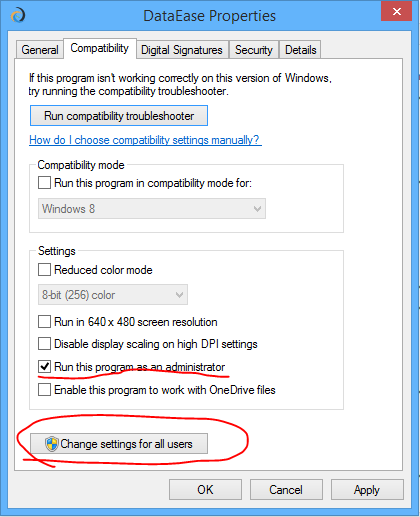
4. Check: Run this program as an administrator.
5. Choose Change Settings for all users, and OK the entire thing.
6. If you run LegEasy 6 as a single user you are now finished.
If you run LegEasy 6 in a networked environment you still have some work ahead of you before you have been "rescued".
The problem with this approach is that you run LegEasy in a completely different User Environment than the one you normally do. You run it in an Administrator Environment which do not have access to Mapped Network drives and the User Environment so the first thing you need to do is to patch your Registry so your Administrator Environment can access the mapped network drives.
7. Open RegEdit
8. Go to HKEY_LOCAL_MACHINE\SOFTWARE\Microsoft\Windows\CurrentVersion\Policies\System<br>9. Create a DWORD value named EnableLinkedConnections and set it to 1<br>10. Reboot the computer
11. Search up CMD, right click on it and start it as Administrator.
12. Type: Net Use
13. You should now see all your mapped drives.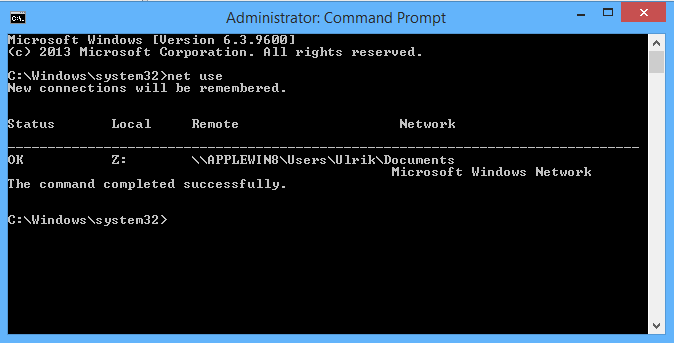
14. The next thing you need to do is to set DENAME and DEPATH as proper Sytem Variables rather than in a bat file starting DataEase.exe (If you use a batfile to start DataEase.exe it will now work if you start it as Administrator, but you will not be able to save this setting on a shortcut that point on a .bat file so better to set this up properly once and for all).
15. Right Click on Computer, and select Properties and then Advanced System Settings.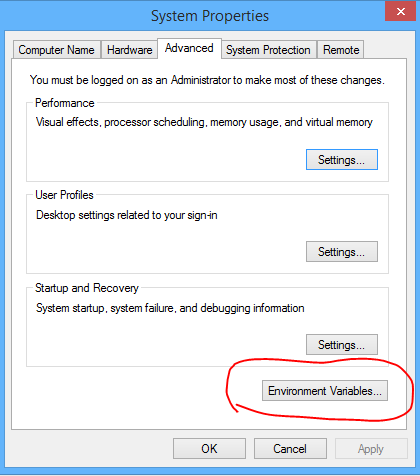
16. Click on Environment Variables.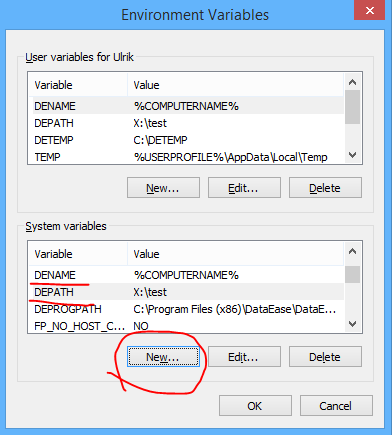
17. Add two new System Variables:
DENAME=%COMPUTERNAME%
This will automatically set the DENAME to the computername and can be used in any loginscript. You can of course set DENAME manually too.
DEPATH= Your Depath.
This should be it. Now you should be good to go and everything should work as before.
This might look daunting, but it is rather straight forward as long as you take care and don't rush.
Copyright © DataEase Limited. All Rights Reserved

