 Register
 Sign In

Custome TableView/FormView Toggle, fun with LabelExecDQL, SetClass, Custom Menu, Custom Toolbar, MoveObject etc...
We had a request the other day about manipulating the TableView, which strictly speaking you can't.
The table view is a GUI functionality that is not programmable, but due to "flaws" in the design over the years you can cheat a little but not completely, which renders it a futile attempt.
However...
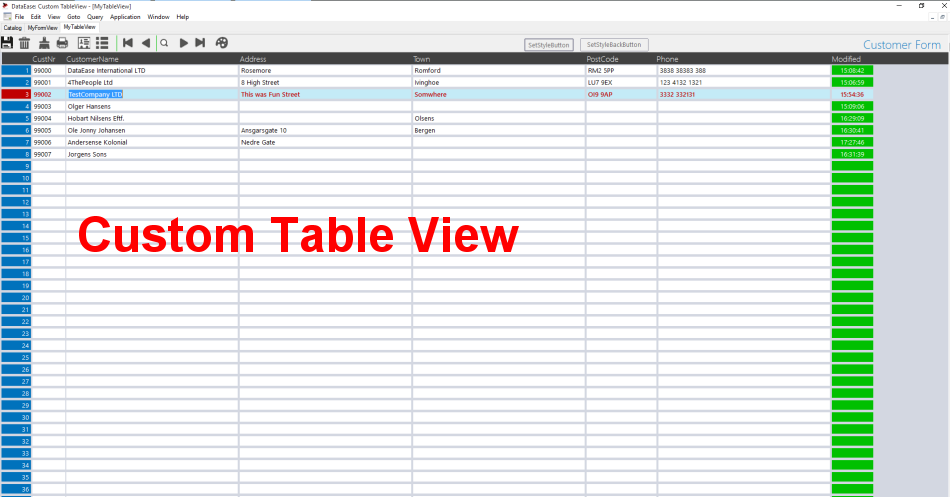
You can make your own TableView!
This "problem" is a brilliant opportunity to showcase the versatility of the DE85 model.
1. You can have as many forms on top of the same table/tables as you like.
2. You can change default handling from menus, short-cuts, actions etc.
3. A form can be 1 or multi records - so Many to Many if you like, (Most of you though it was only one to many).
4.You can put a lot of stuff outside the Record object, i.e. directly on the form like buttons (toolbars), Virtual fields (no column binding) but Editable to be used with GetValue()/SetValue() etc.
5. LabelExecDQL() - write your code directly in the form and simply hide it when you run.
6. Magic i.e. what you see is not what really happens.
7. How we can use buttons as "sub routines", this is a nice lazy trick so you don't have to repeat code. Transfere "data-entry" to the button via SetVar()/GetVar() and it is even more flexible.
8. Move and Size things to make it look neat and more user-friendly with MoveObject.
And much much more.
It is a little work to make your own table view, but suddenly you have NONE of the awkward limitations of the default Table View.
1. You can have your own "toolbar", header, navigation etc.
2. You can manipulate freely the entire table view.
3. You can program in the fields, change colours and have actions on click and any other event.
I guess we should spend some time discussing the different methods.
1. How to manipulate DataEase to open our new form instead of default Table view.
What we can do:
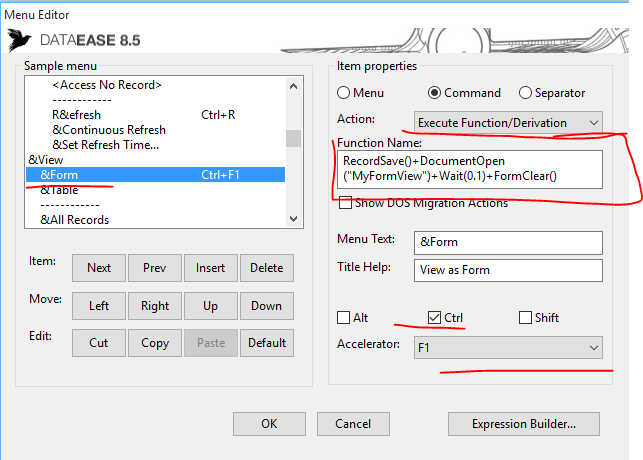
We can change the actions and short-cuts on the Menu, which will cover using the User Menu (and we add the shortcut CTRL-F1)
What we can't do:
Change the action on the toolbar, so that needs to go and we replace it with our own toolbar defined directly on the Form Object.
Next step is to create our own toolbar, what about making the icons a little bigger too...
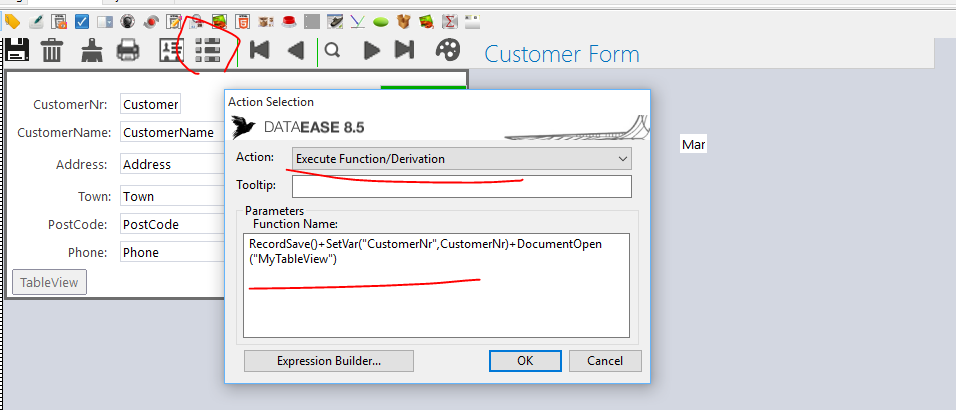
They are simply image buttons with actions on them, on top of a rectangle.
The toolbar background and the Form Header we resize and move about to make it look nice. This we do in the Manip field.
We also resize the Record object (object name Record1) and position it Centre/Centre.
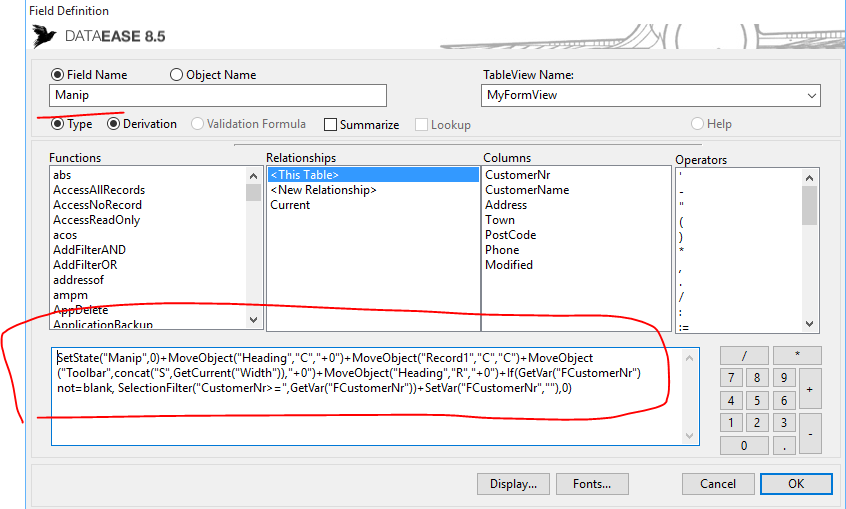
SetState("Manip",0) -- Hide this field
+MoveObject("Heading","C","+0") -- Move Heading to centre, this is overridden again later in code. Change of mind, happens with evolutionary programming ;-)
+MoveObject("Record1","C","C") -- Move Main (and only here) record object to Centre/Centre.
+MoveObject("Toolbar",concat("S",GetCurrent("Width")),"+0") -- Resize Toolbar Rectangle to fill screen.
+MoveObject("Heading","R","+0") -- Move Heading to Right of screen, on top of Toolbar object.
+If(GetVar("FCustomerNr") not=blank, SelectionFilter("CustomerNr>=",GetVar("FCustomerNr"))+SetVar("FCustomerNr",""),0) -- This is "return" behaviour when you come back from TableView. Here we check the golbal variable FCustomerNr and if it is set we set the selection filter of the form to point at the return record, we do it in such a way that you will also be able to flick foward in the data by setting the Selection filter to be >=.
Since Manip is only fired on "change" i.e. new record, we send a FormClear() to it from MyTableView, this is a neat "trick" to trigger action. Windows Handle abuse...he,he.
Finally we clear the FCustomerNr global variable as if not we would enter into an eternal loop, since SelectionFilter trigger Manip etc.
Afterthought: In this sample we copy the code for TableView around i.e. we have it three places. 1) The User Menu. 2) The Custom Toolbar. 3) The button in the form.
With 20/20 hindsight we should have put the code only on the Toolbar button and then simply clicked on the toolbar button (TableView) with SetState("TableView",4). That way we could have change the code in one place.
2. The Table View itself.
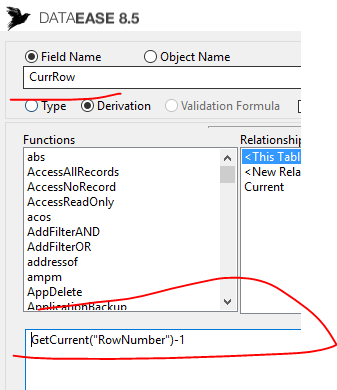
cord object, so whatever record is presented in ROW1 GetCurrent("RowNumber") will return 1. (There is one "bug" and that is that for the first multirecord on screen it will return 2, but for all others it will return 1, so for the first one yo
u simply need to use it -1 and it will work forever. The bug is related to how DataEase "count" records in multiview).
OML will not get the correct RowNumber so you need a GUI object that you can reference, but that suit us fine. We simply put it in like Column 1 in our
TableView - CurrRow.
Now we can reference the RowNumber from OML which is where we will trigger it.
The next thing we need to do is to know when we change record, and what bet
ter way to do that than by "tracking" when we click on a field in a different record.
Luckily Click event on a Record object is called when you click on any object on it, so you don't have to make special handling for each object on it.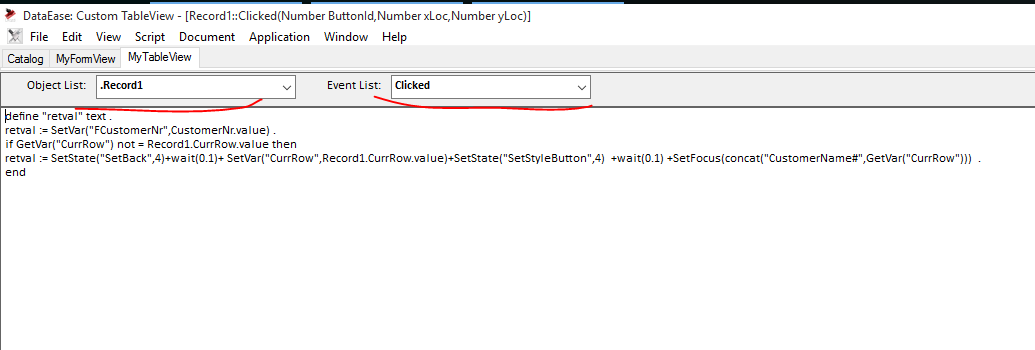
What we do here is to set FCustomerNr global variable so we always know which record we where on if we suddenly return to form view.Then We check if we have changed Row, if we have we will first reset the look on the last row and then set "focus" on the new row. We save "active" Rownumber in global variable CurrRow so we can use it for manipulation.
Since we "cheat" and use Buttons for triggering the LabelExecDQL() that do the job on the different fields we will need to reset focus to the row, this would not be necessary if we triggered the DQL directly.
See how we use SetState("objectname",4) -- click to execute the code.
The Action on SetStyleButton is simply: LabelExecDQL("SetStyleAll","RowFocus","RowDelete","RowFocus",GetVar("CurrRow"))
We use the same DQL to set style on all columns and we have the option of setting 3 different styles at the same time.
The DQL we trigger which is typed into the Form as a label called "SetStyleAll"
define "retval" text .
if data-entry field2 not =blank then
retval := SetStyle(Concat("CurrRow#",data-entry field4),data-entry field2) .
end
If data-entry field1 not = blank then
retval := SetStyle(Concat("CustomerNr#",data-entry field4),data-entry field1) .
retval := SetStyle(Concat("CustomerName#",data-entry field4),data-entry field1) .
retval := SetStyle(Concat("Address#",data-entry field4),data-entry field1) .
retval := SetStyle(Concat("Town#",data-entry field4),data-entry field1) .
retval := SetStyle(Concat("PostCode#",data-entry field4),data-entry field1) .
retval := SetStyle(Concat("Phone#",data-entry field4),data-entry field1) .
end
if data-entry field3 not=blank then
retval := SetStyle(Concat("Modified#",data-entry field4),data-entry field3) .
end
In this DQL we specifically set each column, but we will soon expand SetClass to include wildcards. When that is in place you will be able to use prefixes on your objects and then set them all with one SetFunction.
SetStyle("tabMain*","Normal") will then set all objects with the prefix tabMain to Normal.
3. How to manipulate fields in "active" record.
Since all of this started with problems to "control" a specific record in the default table view, I guess we need to include the handling of that.
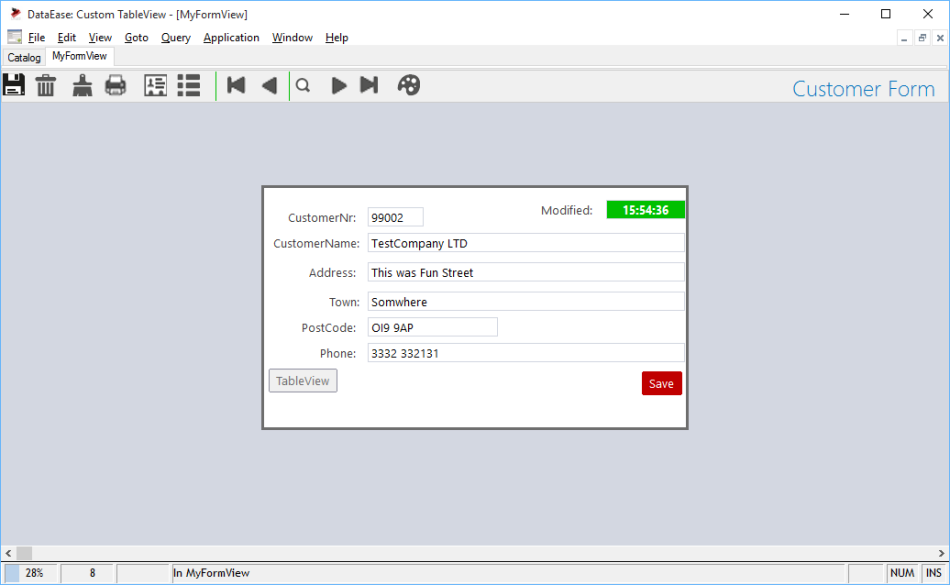
What we have done is simply to "timestamp" the active record when you hit F8 or save in the TableView. We have done the same in formview but there is one distinct difference.
In Formview the "replacement" code for Save looks like this:
SetValue("Modified",current time)+RecordSave()
But if we use the same code in the table view only the first clone of Modified will be set, so here we need to employ our little trick with setting the acitve row number in the global variable CurrRow and combine it with the # option in SetClass.
SetValue(concat("Modified#",GetVar("CurrRow")),current time)+RecordSave()
Not much of a difference in code, but it does all of the difference.
Good luck!
PS! We have most likely forgotten to explain half the code/hacks and tricks in this sample and for that we ask forgiveness, but it is INSPIRATION so give your brain a kick up the backside and get it in gear. There is nothing you can't do with DE8.5 if you put your mind and will too it.
Copyright © DataEase Limited. All Rights Reserved

